Saturday 22 December 2018

Oppo Realme 1 Stock Firmware Back To Stock ROM

Do you want to install Stock ROM on Oppo Realme 1? then, you are at the right place. Here we will share all the latest Oppo Realme 1 Stock Firmware Collections. Here we have shared the full list of firmware link to download and install stock firmware on Oppo Realme 1. As we know, Android is one of the highly customizable software and there is a possibility that we may end up in a situation of lag, boot loop or soft brick. Then, this guide will be helpful. It is always good to keep the Realme 1 stock firmware with you in case something went wrong.
If anyone faces problems like Screen freezing, unresponsive Touch, camera fail or bootloop, you can factory reset or flash the latest Oppo Realme 1 Stock Firmware. Check the other advantage of Stock Firmware given below.

Oppo launched their new smartphone called Realme 1 in India. The Realme brand is aimed at the Indian youth which will be exclusively available on the online marketplace. With Realme 1, the company 3 variant with 3GB, 4GB, and 6GB RAM support.
If you have bought this device and looking for the fresh installation of Stock ROM, then you can simply grab the download link and flash the firmware on your phone by following the guide.
Android always opens the door to various possibilities such as flashing custom ROM or kernel or APK modding etc. These feats can be achieved by providing root access to your device or simply rooting your phone.  In today's date, rooting or customizing is no rocket science, but people perform these process carelessly. Certain users hastily carry out the modding/rooting process without properly following instructions. It leads to bricking of the device. It can happen with any device. In this post, we will tell you how you can restore or unbrick Oppo Realme 1 back to the previous working condition.

Oppo Realme 1 Specifications:

Oppo Realme 1 features a 6-inch full-HD+ display with a screen resolution of 1080x2160 pixels. It is powered by an octa-core MediaTek Helio P60 SoC processor clubbed with 3GB, 4GB, or 6GB of RAM depending on the variant, as well as a dual-core AI-specific chip. The device runs ColorOS 5.0 based on Android 8.1 Oreo, complete with an India-specific theme. The camera on Realme 1 sports a 13MP rear camera with LED flash, and an 8MP front camera.
As for storage, the Realme 1 comes with 32GB, 64GB, and 128GB of inbuilt storage, depending on the variant, each of which is expandable via microSD card featuring its own dedicated card slot. Along with other connectivity such as Dual Sim, VOLTE, Bluetooth, WiFi, etc, It also backed by a 3410mAh battery.

List of Oppo Realme 1 Stock Firmware Collections:

Version [File Name]Download Link
CPH1859EX_11_A.20_180925_4c47a115Download Here
CPH1859_11_A.19_180806Download Here

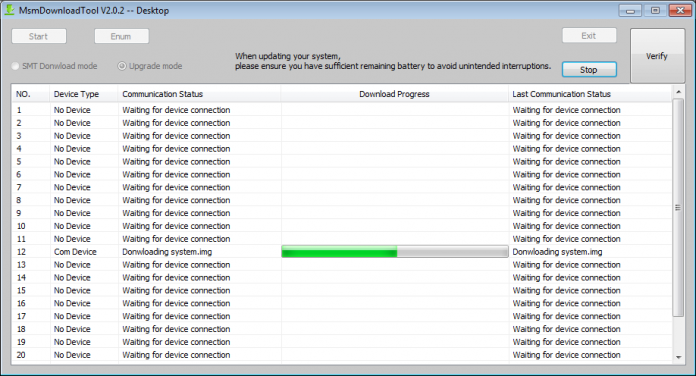
Steps to Install Oppo Realme 1 Stock Firmware:

Before installing, make sure to follow the pre-requisite and install the necessary drivers and tools on your PC.

Pre-requisites

  • Charge your phone: Before you proceed with the below information, you are recommended to ensure that your Oppo Realme 1 is at least 50% charged.
  • Laptop or PC: To carry out this installation, you need PC or Laptop.
  • Take Device Backup: The very first thing to pay attention to is taking the device backup. You might not be able to take the backup of phone data, however, if you have inserted a memory card in your device, remove it at least to save it.
  • Smartphone Flash Tool: Download the latest SP Flash tool and extract it (Install)
  • VCOM driver: Download VCOM Driver and install on your computer (still compatible with MT67xx phones)
  • Install Latest Driver: Install the Latest Realme USB Drivers. [For All Android USB Drivers]
  • Download: Download the below given required files on your PC.

Realme will allow Realme 1 and Realme 2 Pro users to unlock the bootloader


Realme, the OPPO sub brand, made waves in the Indian market with the launch of the Realme 1, selling as many as 400,000 units in 40 days. This was followed up by the launch of the Realme 2, and then the Realme 2 Pro. Powered by a Qualcomm Snapdragon 660 SoC for a starting price of ₹13,990 ($196), the Realme 2 Pro offers serious competition to the likes of established players like the Xiaomi Redmi Note 5 Pro and the ASUS ZenFone Max Pro M1.
Unfortunately, OPPO’s Realme devices have their own cons, one of which is the lack of bootloader unlocking support. Without an officially unlocked bootloader, Realme smartphones have a very large, and very often impossible, hurdle to clear before any custom ROM, kernel and other third-party development can take place. As an extension, this also means that attempts to unlock the bootloader unofficially too would void the warranty on the device. Effectively, this will stifle the development of the device, meaning that you will be stuck with whatever OPPO tries to push to the device (or realistically, does not push to the device as it is considered a budget device after all).
Thankfully, the situation seems to be changing. Realme CEO Mr. Madhav Sheth has informed users through Twitter that Realme is looking to allow users of the Realme 1 to unlock their bootloaders. This will be followed by the release of kernel sources for the device, with an expected ETA of first quarter of 2019.


Bootloader unlock for the Realme 2 Pro has already been confirmed in a prior video of #AskMadhav, which is Realme’s attempt at creating an open feedback and dialogue system with its community. Unlock options for the device will be available before January 15, 2019.

We certainly appreciate the CEO of the company making promises on a public platform, and we would appreciate Realme as a serious company even more if it follows through with its promise. There are a few unanswered questions, like the bootloader unlock status as well as status of kernel source releases of other devices in the Realme portfolio, and we hope the company addresses them soon as well.

T-Mobile OnePlus 6T MSMDownloadTool Firmware 9.0 v1 & v2


Okay folks, took forever to find, but we finally have it, the T-Mobile OnePlus 6T MSMDownloadTool, your brick savior, bootloader relocker, among other things, I will include a basic faq at the end.

Requirements:

1. Windows PC
2. OnePlus 6T - T-Mobile Version ONLY (It will fail otherwise).
3. Zip linked below, unzip and keep all files within the same folder.

Steps to restore are as follows:

1. Open up your working folder and run MsmDownloadTool V4.0.exe
2. Power off the device, unplugged from the working pc. 
3. Holding Volume up and down together, plug the device into the working pc (device should now show up in the tool, if it doesn't you may need the qualcomm usb drivers)
4. Once your device shows up, hit start and sit tight, device will reboot upon completion.

MSMDownloadTool 9.0v2: DOWNLOAD LINK
MSMDownloadTool 9.0v1: DOWNLOAD LINK

USB Drivers can be found here: https://androidfilehost.com/?fid=11410963190603879743

Clock Work Mod Recovery

Clock Work Mod Recovery

It is one of the most famous custom recoveries along with TWRP. These recoveries provide a lot more features over the stock recovery that comes with the device. It’s needed to make further modifications to your smartphone su


Pros and Cons of installing CWM Recovery on Realme U1

  1. Allows rooting the phone.
  2. Custom ROM installation on the phone.
  3. Creating backups of the data and restore it at your choice.

  1. The device warranty voids.
  2. Risk of bricking your device if something goes wrong in the procedure.
  3. An end to the Over The Air (OTA) updates from Manufacturer.

Procedure of Installation of CWM Recovery

Prerequisites

  1. It’s important to have the device fully charged as the process can take some time and you don’t want to run out of juice right when you need it.
  2. Make sure to back up all important data.
  3. We are not responsible for any loss or damage to the device
  4. Do make sure that the bootloader is unlocked on your Realme U1. If not then follow this link to Unlock Bootloader.
  • Download Rom Manager app from Play store.
  • Use the application to take backup of the current ROM. Name the backup you created.
  • After taking the backup, click on “Flash Clock Work Mod Recovery”. Chose the appropriate model number and continue.
  • After downloading, it will ask you to install it.
  • The installation procedure requires the phone to reboot.
  • Now after it’s done with the installation, your Realme U1 has CWM custom recovery on it.
  • And to boot into recovery mode, use the ROM manager application you installed and select “Reboot into Recovery” option.
Click on this link to read about how to root your Realme U1 device.

How to Install Custom ROM on Realme U1


This article will take you through the procedure on how to install Custom ROM on Realme U1 device. Also, in this article, we mentioned the risks and benefits of installing custom on your Realme U1 device.

Custom ROM?

A custom ROM means a firmware for the Android platform made by developers to provide extra functionality. Some benefits of installing custom ROMs are:
  1. Customizable user interface
  2. Added functionality over stock ROM
  3. Ability to upgrade to the latest versions of Android
  4. And increased performance
Now, let’s look at some disadvantages of installing custom ROM:
  1. Mostly, if you install a custom ROM on your device, it will void warranty.
  2. Risk of damaging your phone if the procedure is not followed properly.

How to Install Custom ROM on Realme U1

Prerequisites

  • Have the phone fully charged.
  • Do make sure to unlock the bootloader on the device. Unlock Bootloader.
  • Also, the device should have a custom recovery installed on it. Check these articles to install CWM Recovery or TWRP Recovery.
  • And the device needs to have Root access for it to proceed.
  • We do not take any responsibility for any damage or loss.
Now that your device is ready to install Custom ROM, follow the steps below:
  1. Look at different options available for your device and download the custom ROM that you like. Transfer the zip file to your device storage
  2. Now boot the device into custom recovery. Press volume down and power button to boot into custom recovery.
  3. Backup the firmware before installing custom ROM so in case anything happens, you can revert back to it.
  4. Perform factory data reset by wiping user data and cache.
  5. After its done, flash the custom ROM by choosing the zip file. You will need to select the install option to do so. Now install custom ROM file on the device.
  6. When it’s completed, reboot your device and it should have the custom ROM installed and running on it.

Hopefully, this article would have helped you to Install Custom ROM on Realme U1.

Download RMX1801 / RMX1807 Oppo Realme 2 Pro Flash File Firmware


Download Official Firmware [Flash File] Oppo Realme 2 Pro-

Download Official Stock Firmware Flash File For Oppo Realme 2 Pro. If you have Oppo Realme 2 Pro Smartphone and You want to download the Stock ROM /Flash File/For it then You are on a Correct Place, You have to do this by following the Below Guide.
The Oppo Realme 2 Pro is a Smartphone Which is Run on android 8.1 OS and Powered by a Qualcomm Processor, the Oppo Realme 2 Pro is a Dual sim Smartphone that accept 2 Regular SIM card, connectivity Option’s include 3G  4G. GPS. Wi Fi, Bluetooth etc, Sensor include Goryo proximity Gravity etc.
In Some cases We have bricked our device, then we can bring back the phone (Unbrick) using the Stock firmware anytime. Also if you feel your Oppo Realme 2 Pro lag or has an issue, then flash the stock firmware from the list below and save from situation. Stock Firmware doesn’t void a warranty on your Oppo Realme 2 Pro.


Note-

1. This Guide is Work only On listed Phone So Please Don’t try it on any other Phone.
2. Flashing The ROM Will Erase all your Data So Must Create a backup of your personal data before Flashing.
3. Please Do Carefully. We are Not Responsible for any damage, bootloop, or dead SD card’s.
4. Ensure that your Device at-least 50% Charge During Flashing Process,to Stop the Accidentally Switch off.
5. Follow all steps correctly otherwise it cause bootloop.
6. Must backup NVRAM using this Guide [MTK only] before Doing anything.

Download:

Firmware: RMX1807/1801_11_A.05_180926_598934c8

Product name: Oppo Realme 2 Pro
Type: Full ROM
ROM Size: 4 GB
SoC: QCOM
Os: Android 8.1
Password: Null
Gapps: included
Root access: Not
Product version: RMX1807_11_A.05_180926_598934c8

Download:

Firmware: RMX1801 Here

 RMX1807 Here 

QFIL Edition: RMX1807  Here


How to Install Official Firmware/ROM/Flash File Oppo Realme 2 Pro-

Saturday 24 November 2018

Download CPH1901 Oppo A7 Stock Firmware Flash File

Download Stock Firmware/Flash File Oppo A7:


Download Official Stock Firmware Flash File For Oppo A7. If you have Oppo A7 Smartphone and You want to download the Stock ROM /Flash File/For it then You are on a Correct Place, You have to do this by following the Below Guide.
In Some cases We have bricked our device, then we can bring back the phone (Unbrick) using the stock firmware anytime. Also if you feel your Oppo A7 lag or has an issue, then flash the stock firmware from the list below and save from situation. Stock Firmware doesn’t void a warranty on your Oppo A7.
Oppo A7 Smartphone is Run on android oreo OS Which is Powered by a QCOM Processor. the Oppo A7 is a dual SIM (GSM and GSM) smartphone that accepts Nano-SIM and Nano-SIM. Connectivity options include Wi-Fi, GPS, Bluetooth, NFC, USB OTG, FM, 3G and 4G.

Note-

1. This Guide is work on Listed Devices only. So Please Don’t try it on any other Phone.
2. Flashing The ROM by Flash tools will Erase all Your Data. So create a backup of your Personal data before Flashing
3. Please Do carefully We are Not Responsible for any Damage, bootloop or dead SD card’s.
4. Ensure that your Device at-least 50% charge During Flashing Process,to Stop the Accidentally Switch off.
5. Must backup NVRAM using this Guide before Doing anything.
Must Require:
1. backup NVRAM
2. backup Your Personal data
3. Create a nandroid backup

Firmware Information-

Product name: Oppo A7
Type: Full ROM
ROM Size: up to 4 GB
SoC: QCOM
Os: Android oreo
Password: FirMware27
Gapps: Included
Root access: Not
Product version: CPH1901EX_11_A.01_181029

Download:

  • Firmware Oppo A7 [Pass: FirMware27] Download

Tools:

  • Download tool Here

Driver: 

How to Install Official Firmware/ROM/Flash File Oppo A7-

  • Flash tools Guide- Go Here
  • OTA Guide [ update ]: Here
Have any question Let us know via Comment.

Tuesday 20 November 2018

Flashing With MSM Download Tools - ROM-Provider


1.MSM DOWNLOAD TOOL 3.0                       DOWNLOAD
2.DRIVERS                                                          SEARCH IN WEBSITE
3.STOCK ROM / FIRMWARES                         SEARCH IN WEBSITE
4.DOWNLOAD TOOL VERSION 1728.30       DOWNLOAD

MSM Download Tools Flashing Guide:

Note-

1. Flashing The ROM by Flash tools will Erase all your Data. So create a backup of your personal data before Flashing, [if possible]
2. Please Do carefully, We are not Responsible for any damage, bootloop, or dead SD card’s.
3. Ensure that your Device at-least 50% Charge During Flashing Process,to Stop the Accidentally Switch off.
4. Follow all steps correctly otherwise it cause bootloop.
5. Must backup NVRAM using this Guide before Doing anything.

Require tools and Files-

Flashing with MSM Download tools:

  1. First of all, Download the file required above and extract it on your computer.
  2. Now in the extracted folder, Run the file named MsmDownloadTool V3.0.exe as an administrator
  3. When you see the screen Load firmware, now turn off your phone
  4. Connect your phone to PC using USB Cable while pressing VOLUME UP button.
  5. Then Click Start to Being the Flashing. Wait until the installation completes.
  6. Once you see the “Download complete” message, you can unplug your phone from PC.

Official Firmware for Oppo A3s CPH1803 Qualcomm

Free Download Official Firmware & Tool for Oppo A3s CPH1803 Qualcomm, ofp File, for Unbrick Dead after Flash, Repair Stuck on Logo, Screen Unlock, Pattern Unlock, FRP (Factory Reset Protection) / Google Account, etc.
  • Official Firmware ODM Oppo A3s CPH1853
  • Official Firmware Oppo A3 CPH1837

How to Flash Oppo A3s CPH1803

For Flashing Oppo A3s CPH1803 Using MsmDownloadTool (Oppo Official Tool), for Open MsmDownload Tool You Need  Install the PdaNet and Codemeter Oppo Tool , and You need Username and Password for can use DownloadTool.


WARNING !!!
  1. Ofp file is Official Firmware from Oppo, and QFIL File is results extract from from Firmware.
  2. Using the type of ofp file requires a username and password to use the Official Tool.
  3. Username & Password

Download:

Firmware CPH1803EX_11_A.02_180705_88dff542.tar.bz2

Product name: Oppo A3s
Type: Full ROM/OTA
ROM Size: 4.3GB
SoC: QCOM
Product version: CPH1803EX_11_A.02_180705_88dff542.tar.bz2
Os: Android 8.1
Password: Null
Download: G Drive Mirror androidhost Mediafire

How to Install Official Firmware/ROM/Flash File Oppo A3s-


Have any question Let us know via Comment.

OPPO A3S Mobile Phone Hard Reset and Remove Pattern Lock

Steps to Hard Reset oppo A3S / Factory Reset A3S & Pattern Unlock in OPPO A3S Mobile Phone with Keys & Code

There are two methods to reset OPPO A3S mobile phone. Make sure you have taken the backup of your mobile data, especially phone memory contacts and gallery before proceeding with the reset.


How to reset Oppo A3S Mobile Phone
Method 1:
Below are the Oppo A3S settings to format your Phone
  • Switch off the OPPO A3S phone
  • Press the Volume Down button and Power button together for few seconds
  • Select the language by pressing the Power button
  • Use the Volume up/down buttons to navigate between the options
  • Select ‘Wipe Data / Factory Reset’ by pressing the Power button
  • Select ‘Yes’ by pressing the Power button
  • Use the Volume up/down buttons to navigate between the options
  • Select ‘Yes – Reboot Now’ by pressing the Power button
  • The phone is now formatted and ready to use.
Method 2:
Below is another way to format your Oppo A3S Mobile – Oppo A3S  hard reset method.
  • Turn on OPPO A3S mobile, navigate to Settings.
  • Look for Backup & reset option and select the same.
  • Tap the Factory Reset option.
  • Select Reset Device.
  • Select ‘Erase Everything’ and wait till the phone gets rebooted with fresh set of data.
WARNING: Hard Reset will erase all your data, Kindly Be Careful.

How to Install Stock firmware on any Samsung smartphone using Odin downloader!!

Did you brick your Samsung device ? Do you want to upgrade or Downgrade your Samsung smartphone ? Here is a better solution. Now you can flash any stock firmware right from your home without leaving your phone at service center. Yes! In this guide, we will guide you on how to install stock firmware on your Samsung smartphone. To flash you will need to download ODIN software which allows you to flash Samsung software on your Samsung smartphone. Follow the below full guide. Before doing any procedure, its always better to read carefully instead of skipping the steps.

The guide is simple and easy. All you need to do is download the right firmware for your device. To see if you have any stock firmware for your phone. If you couldn't wait, just search for your firmware with "firmware (your phone model)" and flash the firmware via ODIN tool using our guide.

Download and Install the Samsung Kies Software : CLICK HERE or
Download and Install the SamsungUSB Drivers : CLICK HERE


https://drive.google.com/uc?export=download&id=13c_OhTr0ozxqdpMGb0CidVrBRyaUxzpV

DOWNLOAD FILES
 Download ODIN Software

 Download Stock ROM here

Steps For How To Install Stock Firmware on any Samsung Smartphone using ODIN
1.If you have downloaded and installed the file from above then you are good to Go – Read from Step 2
2.First of all, enable the USB Debugging
To Enable the USB Debugging you need also active the developer option, Now Go to your Settings -> About Phone -> Now Tap on the Build Number 7-8 Times until you see a toast message “Developer option enabled“
Once your developer option is active, Go back to your settings -> Open developer option -> 3.Enable USB Debugging
4 .Open the Extracted ODIN File called ODIN v3.11.1 exe file using the Administrator – Right 5.Click your mouse and Open using Administrator odin5.Now Reboot your Phone into Download Mode
So First Turn your Phone off -> press and hold Home + Power + Volume Down buttons Until you see a download mode.
6.Now Connect your Phone to PC using the USB Cables
When you connect the USB cable you will see a blue sign in Odin
7.Now Go back again Odin and Add the firmware which you downloaded from Above by Clicking AP/PDA Button
8.Now Make sure re-partition is NOT ticked – Go to Option and see (Let the Auto Reboot and F-Reset Time be ticked)
9.wait few minutes until you see a message pass. Once you see PASS then you can remove your Phone from the part. Don’t Panic if you see your Phone restarts while updating.
Note: You should not remove or operate on your device until the flashing process in shown to be completed.

Once the flashing process is completed and if everything has gone as planned, you should be able to see a big green box saying "RESET" or "PASSED." This will depend on the version of Odin downloader you have downloaded. By now, the device have finished rebooting and it is safe to remove/unplug the phone/device.

That’s ALL! When you restart your Phone you will have the new stock firmware installed on your device. I hope you learned the procedure on How to Install Stock Firmware on any Samsung Smartphone using ODIN.


Note: You should not remove or operate on your device until the flashing process in shown to be completed.


Once the flashing process is completed and if everything has gone as planned, you should be able to see a big green box saying "RESET" or "PASSED." This will depend on the version of Odin downloader you have downloaded. By now, the device have finished rebooting and it is safe to remove/unplug the phone/device.

Download Samsung Galaxy J4 Plus Combination ROM files and ByPass FRP Lock


Here we have shared all the Samsung Galaxy J4 Plus Combination ROM files.

Alright, so you are planning to sell your old Samsung Galaxy J4 Plus. Well, the first thing that you should do before selling is to remove all the user data that may be present on your Samsung Android Device. Well, the easiest and fastest way to do this is to perform a Factory Data Reset on your Android Device. Now, the reason behind doing a Factory Data Reset on your Android Devices can be many. For instance, you might be selling your device, or might be facing some issues on your Android Device like lags, hangs or adware.


Whatever the case might be, the thing is that you have done a Factory Data Reset on your Samsung Galaxy J4 Plus and now you are not able to use your Samsung Device anymore. Why? Well, this is simply because whenever you pick your Samsung Galaxy J4 Plus, you are greeted with the This device was reset, to continue to sign in with a google account that was previously synced on this device” message on your screen. Well, you can bypass this FRP lock pretty easily and quickly. Wanna know how? Well, let us tell you.

What is FRP Lock?
FRP stands for the Factory Reset. Now for those of you who don't know what a Factory Data Reset is. It is an option in your System Settings which erases all the user's data and preferences and sets the device back to Factory or Default Settings. That's the reason behind its name, 'Factory' Data Reset. Anyways, this was one of the security measures which was taken by Google for its Android Devices running on Android  5.1 Lollipop and later.

This security measure activated as soon as the user signs in to a Google Account on their Android device. And once it has been activated, it will prevent all the users from using the Android Device until the user enters the old Google Account Credentials.

Now, let us take a look at the prerequisites to ByPass FRP lock or Remove Google Account on Samsung Galaxy J4 Plus. Should we?

Download Samsung Galaxy J4 Plus Combination ROM files
Now, in order to do an FRP Bypass on your Samsung Device, you will need the Combination ROM files for the device. But  before we get straight to How to Download and Install Combination ROM on Samsung Galaxy J4 Plus, we would like to clear some things quickly:

Samsung Galaxy J4 Plus combination ROM is just or testing. It’s not effective in fixing the hardware of the device.
Samsung Galaxy J4 Plus combination ROM is the way to go for recovering IMEI number, Baseband, and more.
After flashing this ROM, you won't be able to perform some of the tasks. These include tasks like making calls, texting messages, playing games.
FRP, EE, and other securities are kept with the Samsung Galaxy J4 Plus combination ROM.

J415FXXU1ARI1: COMBINATION_FAC_FA81_J415FXXU1ARI1.rar: 
DOWNLOAD


Prerequisites:
Please note that this guide is only for the Samsung Galaxy J4 Plus. We would never recommend you to try this for any other device.
You need to download latest ODIN on your PC.
Make sure that you have downloaded Samsung Galaxy J4 Plus Combination ROM files
Download and Install Samsung USB drivers on your PC.
Make sure that you have at least a 60% charge left on your Galaxy J4 Plus.
Once you have the above prerequisites, remove FRP lock on Galaxy J4 Plus using ODIN: you can proceed with the instructions.

Instructions to ByPass FRP or Remove Google account on Galaxy J4 Plus
Follow these instructions carefully to remove FRP lock using Galaxy J4 Plus Combination ROM files on ODIN Tool:


Follow these instructions carefully to remove FRP lock using Galaxy J4 Plus Combination ROM files on ODIN Tool: that's it guys, this was our take on How to ByPass FRP lock using Galaxy J4 Plus Combination ROM files. We hope that you found this post useful. Just in case, if you have stuck somewhere between the steps or had any questions related to the topic. Then, feel free to leave them in the comments section down below.